Here's a sampling (all courtesy of the website):


There was also a video (in German) showing off their work (h/t to Thistledown Puppets)


 (denoted in the C equation as
  ) is the eccentricity of the ellipse.
 .
. Look at that picture above again. See the dark curve marked C/2? That, you can see, will be the height of our pattern. That amount is simply half of the circumference, which means it is roughly the amount to the right: [4.5(a+b) - 1.5*sqrt((3a+b)(a+3b))]. That is by far the most difficult part of this process.
 The width of each piece will, like the sphere, be one-eighth (1/8) the circumference of the center circle. Remember that b is the radius of the center circle? That means the circumference is 2πb. Estimate that π is 3, and we get roughly 6b. Now divide that by eight, and we get .75b, as you can see in the formula to the left.
 Now, you simply need to follow the instructions for the sphere. Choose your height-- A=2a, your width-- B=2b for the final product. Now, draw a vertical line equal to 4.5(a+b) - 1.5*sqrt((3a+b)(a+3b)). Through the midpoint of that line, draw a horizontal line equal to .75b. Now, copy the angle made by connecting the end of the horizontal line to the end of the vertical line (M), to make angle N. Make an isoceles triangle (as you can see to the right), and use its tip as a center for your compass to creat a curve connecting the top of the vertical line, the right end of the horizontal line, and the bottom of the vertical line.
 Just to demonstrate that the equation really isn't that hard, take my example from before. Say that I want my height to be 1.5 feet and my width to be 1 foot. Using the formula, we discover that the height is simply 2.27 feet and the width is .375 feet. I can now follow the rest of the instructions, cut out eight foam pieces, and creat my ellipsoid!

Chicago's warmest Christmas
Dear Tom,
When was Chicago's warmest Christmas?
Adam Bednarek, Dyer, Ind.
Dear Adam,
It was nearly 26 years ago in 1982 when Chicago experienced a Christmas that was warmer than most Easters. The afternoon temperature peaked at a balmy 64 degrees, twice the day's normal 32-degree high. While most Chicagoans celebrated a traditional holiday, some people were washing their cars, barbequing and even playing golf. Excited children got an unexpected chance to ride their new bikes and scooters outdoors. The very next year was payback time as the city shivered through its coldest Christmas. After a frigid Christmas Eve when the mercury dipped to minus 25, Christmas Day 1983 dawned with a low of 17 below and could only muster a high of minus 5. The back-to-back Christmases had an incredible temperature spread of 81 degrees, a true testament to Chicago's vigorous and volatile climate.


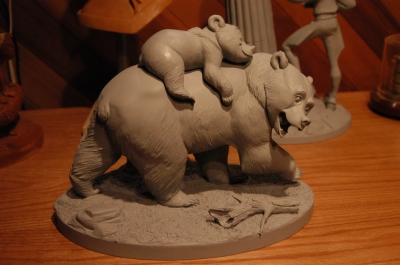
 First, I had to decide what type of clay I was going to use. I knew that I wanted a modeling clay of some type (since I don't have a kiln). I went to the Utrecht store in downtown Chicago and bought medium-pliability, gray-green Roma Plastina. I found that the stuff was perfect; easy to mold (after a little kneading), but firm enough to keep me from worrying that it would melt into itself on a hot day. It cuts pretty roughly, but with some work, it smooths very well and doesn't leave many fingerprints, which was an added bonus for me.


 My first challenge was with the body. My yeti has a huge, heavy body, supported by relatively tiny legs. I needed some way to keep the body from being so heavy that it would make the legs collapse. My solution was aluminum foil. I molded it into the shape of the body and then covered it with a relatively thin (though far more than paper-thin) coat of clay.


 Somehow, my Dad and me putting up Christmas lights turned into a whole family thing...my mom and brother came out to see us and ended up helping with the lights and ornaments. Then we all went in and had hot drinks. It was very Norman Rockwell-esque.
Once humans spent most of their days doing useful things with their hands, and I realized that we were designed to get a deep satisfaction from this. As Hughes put it, "You have the feeling people were supposed to do this kind of work, rather than data entry, which is amazingly horrible."


 Now, have you ever noticed that if you cut a sphere in half along any of the axes (X,Y, or Z), the circle that you get is the exact same size? That's important here. We're going to cut the sphere along the X axis (with an X/Z plane). We get a circle (which I've highlighted in blue). You can see that the height of our sphere piece will be half the circumference of that circle.
 That's handy for us. The circle has a radius of R, which means that it has a circumference of 2πR (see here for that formula). We want half of that, which is πR. This will be the height of our piece. I have drawn it out in the picture to the left.
 What will the width be, you ask? Great question! I am making this out of eight pieces, which means that the width of each piece should be one-eighth (1/8) of the entire length of the sphere's equator. Note that if you are making it out of more or fewer pieces, the fraction will reflect the number of pieces you are making (so, ten pieces, 1/10; four pieces, 1/4). Because this is a sphere, once again, the length of the sphere's equator is equal to 2πR, which means that the length of our piece will be 2πR/8 = πR/4. This is important. It means that the width of our pattern will be one-fourth (1/4) the height. Since a sphere is symmetric in all directions when cut through the center, the width and the height will bisect each other. I've drawn it out to the left. Oh, and don't worry about π right now. We're just going to estimate it as 3 at the end.
 To find this curve is surprisingly simple. We need a circle that has a center on the same axis as our width (the short line). The distance from that center to the end of our width line (the radius of that circle) must be the same as distance from the center of that circle to the top and the bottom of the height line. How can we do this? We need an isoceles triangle, with the two equal sides going from the far end of our width line and from the top of the height line to the center of that circle. Using a compass and straightedge, it's not too hard. Just copy angle M (see picture) to become angle N.


