
First, some reference points.
Here is the awesome site of Shane Zalvin, who has made some professional maquettes for Dreamworks productions (maquettes in the computer animating process are more conceptual, and 3-D character models are made off of them). He has some Disney sculptures as well, but they are for consumer products, not actual productions.
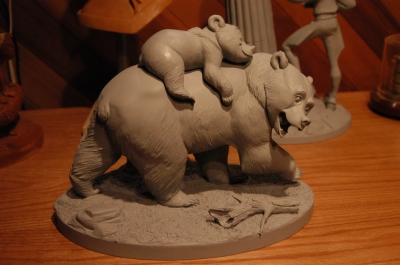
Here are two photos of Disney maquettes, one of Cookie from Atlantis and one of Koda and Kenai from Brother Bear.

For my yeti project, I've been working on the yeti himself as a maquette. Mine has not been baked (and likely won't be), though I'm looking at ways to make a mold for him so I can transfer the sculpture into resin.
How did the sculpture happen, though?
 First, I had to decide what type of clay I was going to use. I knew that I wanted a modeling clay of some type (since I don't have a kiln). I went to the Utrecht store in downtown Chicago and bought medium-pliability, gray-green Roma Plastina. I found that the stuff was perfect; easy to mold (after a little kneading), but firm enough to keep me from worrying that it would melt into itself on a hot day. It cuts pretty roughly, but with some work, it smooths very well and doesn't leave many fingerprints, which was an added bonus for me.
I already owned some cheaper, more oily modeling clay (I think I bought it at Hobby Lobby or Michael's or something). I used that to make a model for the head that I would eventually create out of the Roma Plastina. It was an easy way to try out what I wanted to do.


 My first challenge was with the body. My yeti has a huge, heavy body, supported by relatively tiny legs. I needed some way to keep the body from being so heavy that it would make the legs collapse. My solution was aluminum foil. I molded it into the shape of the body and then covered it with a relatively thin (though far more than paper-thin) coat of clay.
I then began making the extremities. I used sculpting wire around each arm and leg, sticking it into the foil, to make them keep their shape and to keep them better attached to the body. When possible, I wanted to avoid having the clay supporting itself.
I also made a base (which was basically a messy-looking cut of the clay--it looked like rock).


I followed with the head, which I used a toothpick to attach. A few details, and presto! A maquette:


No comments:
Post a Comment